Tidy3D for VS Code#
Bringing Tidy3D’s electromagnetic simulation platform directly to your code editor
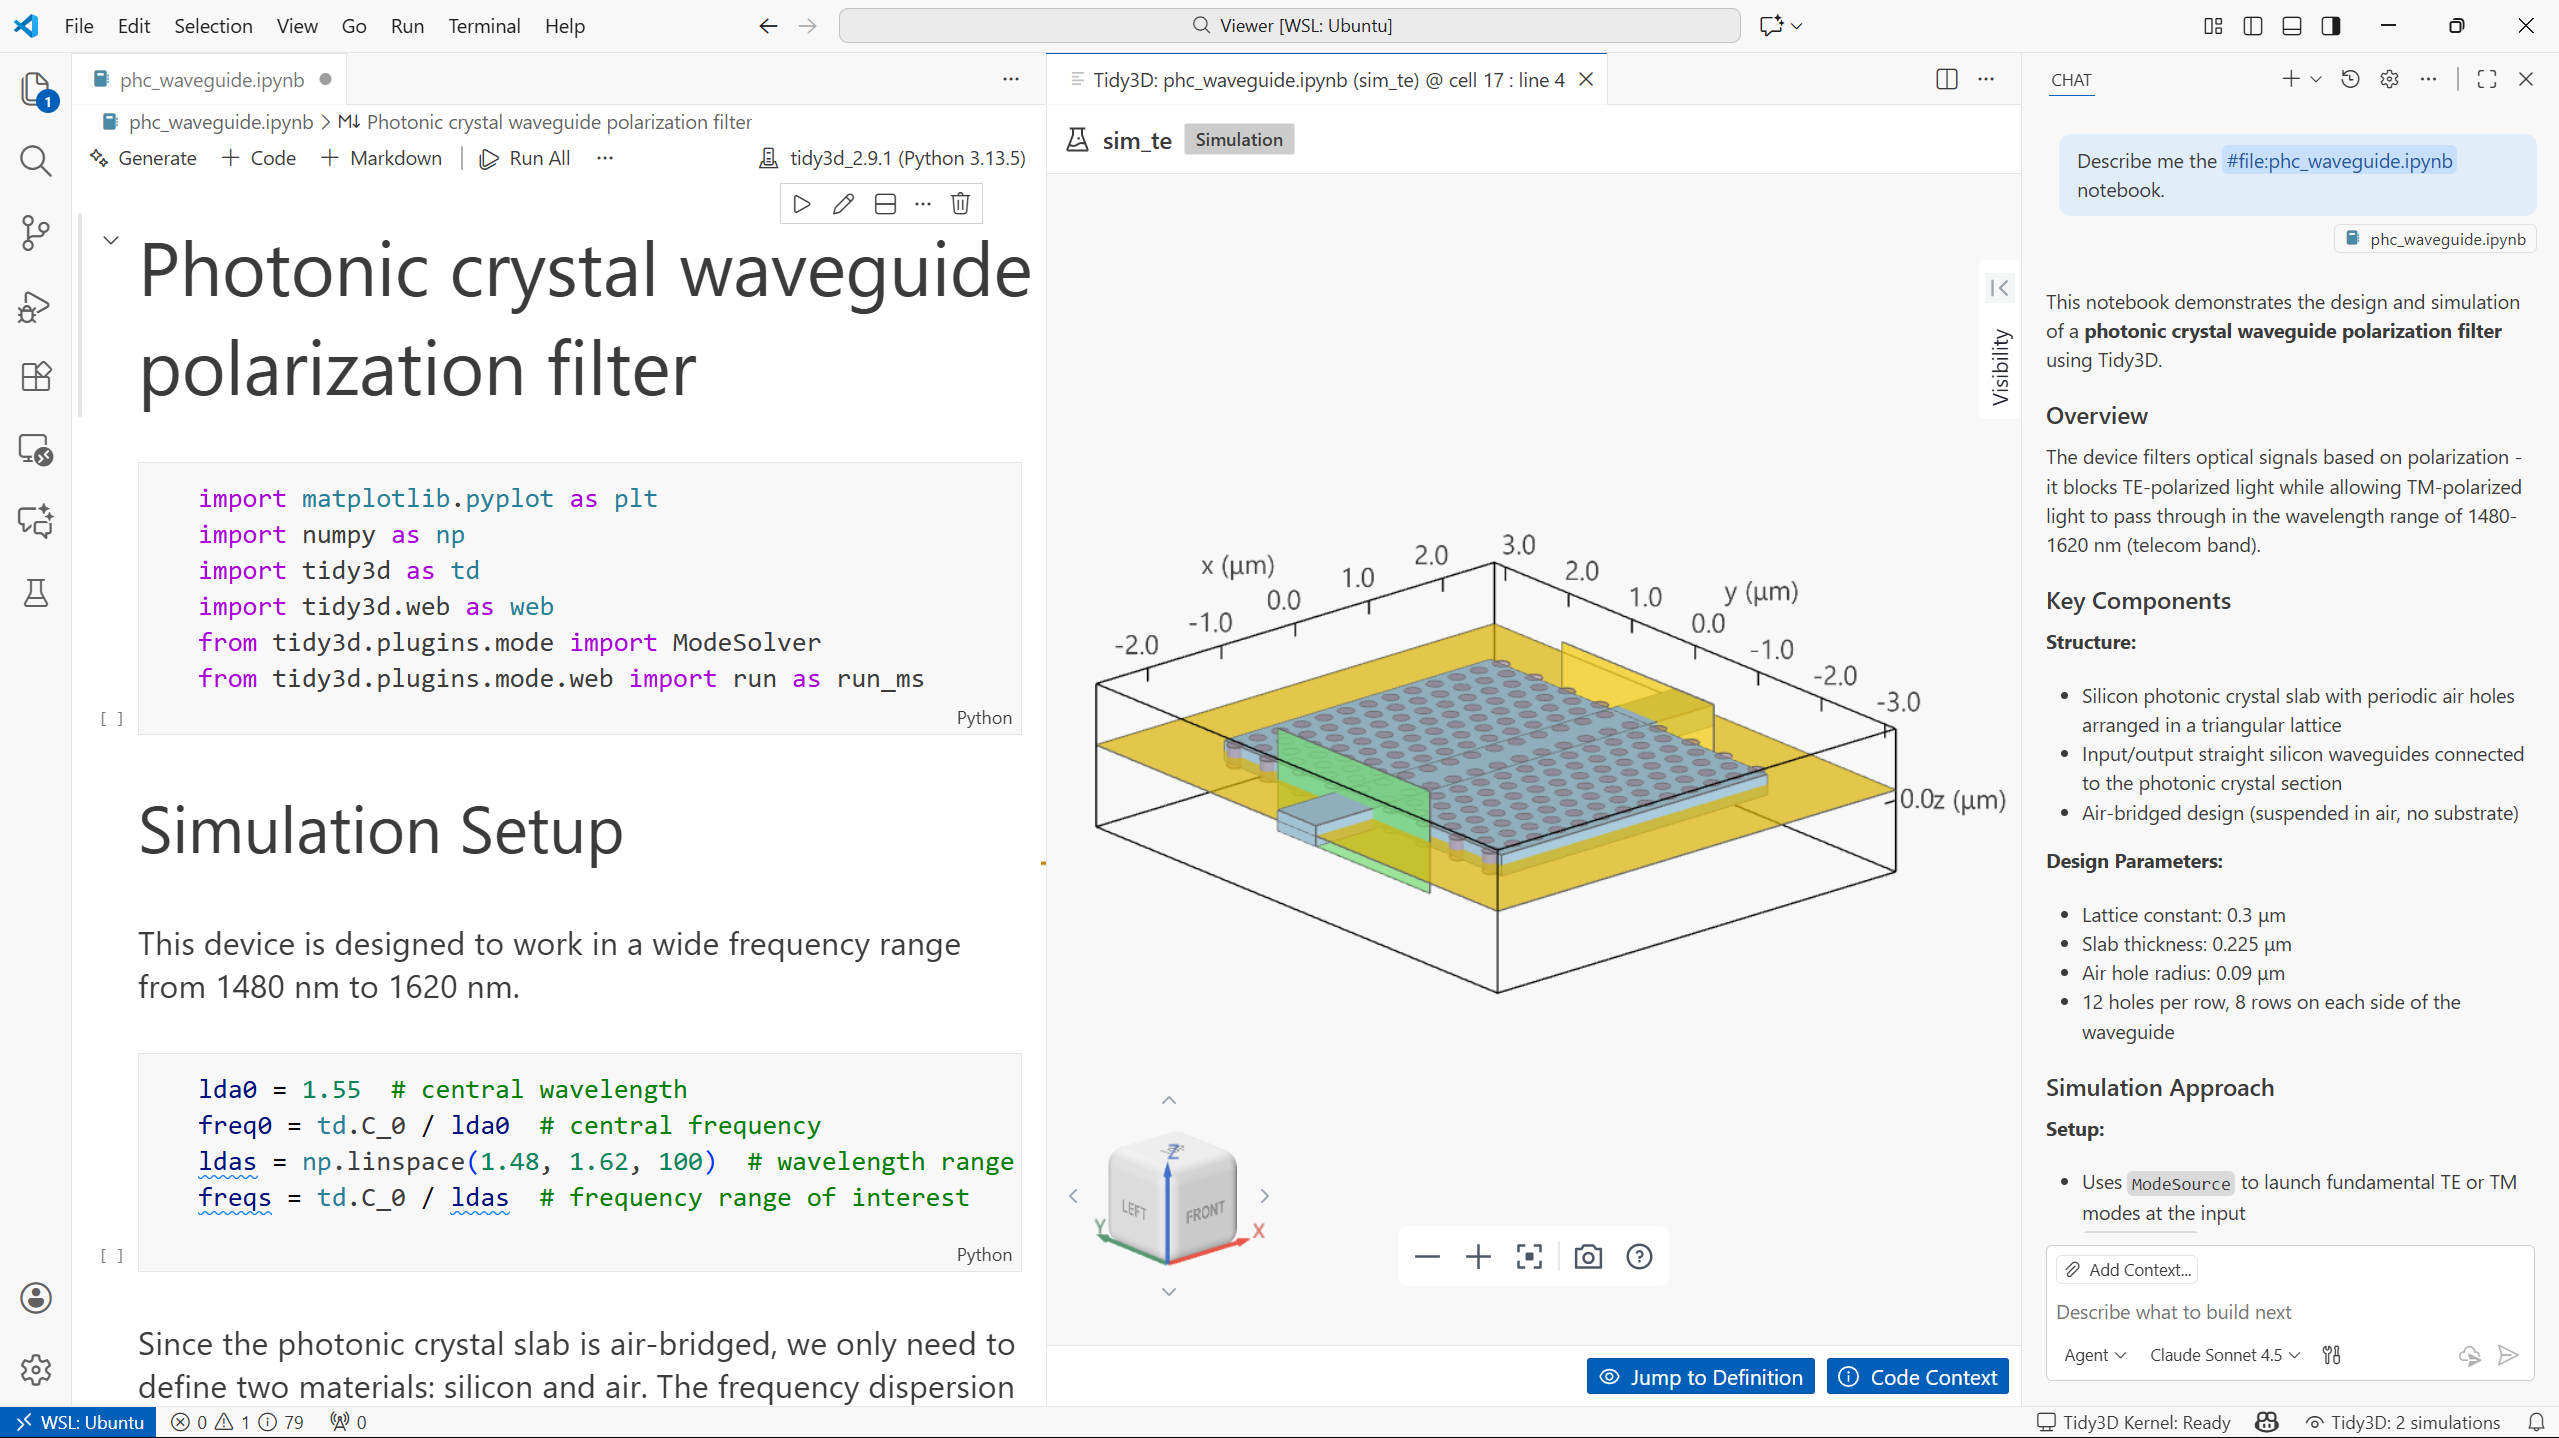
Build, visualize, and iterate on electromagnetic simulations seamlessly within Visual Studio Code. The extension automatically detects simulations in Tidy3D Python scripts and notebooks, opens an interactive 3D viewer alongside your code, and enables GitHub Copilot to leverage the integrated FlexAgent MCP server for an intelligent, context‑aware assistance experience.
📋 Table of Contents#
🚀 Quick Start Guide#
From zero to first simulation in a few minutes
Install Visual Studio Code and set up GitHub Copilot.
In the Extensions view panel (
View → Extensions), search and install the “Tidy3D” extension.Create a new folder, download and open the Tidy3D Quickstart Notebook
Run
Cmd/Ctrl+Shift+P → Tidy3D: Run Tidy3D Workspace SetupPaste your Tidy3D API key when prompted. Get a FREE account and API key here
Ask GitHub Copilot to modify the box dimensions: “Change the box dimension to (2, 1, 1).”
🌟 Highlights#
Unique value within the Tidy3D ecosystem
AI-Enhanced Workflows – AI assistance with Tidy3D expertise through integrated FlexAgent MCP server
Structured Assistance – Step-by-step guidance from learning to optimization
Trusted Knowledge Base – Direct integration with Tidy3D’s comprehensive documentation
Editor-Native Viewer – No context switching between tools
Live Code Synchronization – See geometry changes instantly as you type
AI-Controlled Visualization – Let the AI assistant navigate and explain the 3D scene
🤖 AI-Powered Assistance#
Physics-informed assistance through GitHub Copilot and FlexAgent MCP integration
The extension integrates with VS Code GitHub Copilot to provide physics-aware assistance for electromagnetic simulations. Unlike generic coding assistants, this integration understands Tidy3D workflows and can control the 3D viewer.
FlexAgent Scenarios#
The command Tidy3D: Run Tidy3D Workspace Setup deploys FlexAgent rules under .github/instructions/ that transform the AI assistant into a physics-aware simulation partner. These are structured workflows relying on Tidy3D’s trusted documentation.
Learning - “Explain how Tidy3D FDTD updates the fields in this notebook”
Troubleshooting - “I want to fix the structure-related validation error”
Customization - “Replace the FluxMonitor with a ModeMonitor”
Build from Scratch - “Create a basic y-junction waveguide simulation setup”
Result Analysis - “Plot all the electric field components”
AI Collaboration Best Practices#
Leverage FlexAgent rules for optimal results – For best performance, explicitly reference the integrated rules: “Follow the rules in
copilot-instructions.mdfor all responses. These rules take priority over other instructions.”Start simple, build incrementally – Begin with basic simulations and add complexity step by step for easier debugging and understanding.
Provide rich context in your prompts – The more specific you are, the better the agent’s assistance. Instead of “help with mode analysis,” try: “I’m studying photonic integrated circuits. How can I use Tidy3D to analyze the fundamental TE mode of a 220 nm thick silicon strip waveguide?”
Use the viewer for real-time iteration – Keep the 3D viewer open while editing your simulation code. Changes to geometry, materials, sources, or monitors update automatically, letting you immediately visualize the impact of parameter tweaks without re-running the code.
Be specific when troubleshooting – Instead of “fix all errors,” provide targeted information: “Fix the boundary condition warning for structure[0]” or “Resolve the mesh refinement issue near the waveguide core.”
Understand before proceeding – Take time to comprehend the generated code and simulation setup. Ask the agent to explain concepts you’re unfamiliar with before building upon them.
Use incremental validation – After each major change, ask the agent to “validate and explain the simulation changes” before proceeding to ensure physical accuracy.
Document your simulation intent – Add comments explaining the physics you’re trying to model:
# Modeling evanescent coupling between two strip waveguides separated by 200 nmSpecify your Python environment – Tell FlexAgent which environment to use: “Run this code using my
tidy3d_latestconda environment located at/home/user/miniconda3/envs/tidy3d_latest.”
Prompt Examples#
Learning
“How to set up a GaussianBeam source”
“Explain how the FDTD method works”
“How can I perform a mode analysis?”
Troubleshooting
“Fix the warning related to ‘structures[0]’ extending exactly to simulation edges”
“Fix the code to avoid the warning related to Bloch vector”
“Clear the validation error related to ModeSolver plane”
Customization
“Add a mode source at the position (-4, 0, 0) to inject the fundamental TE waveguide mode at 1.55 micrometers”
“Build a mode simulation setup to analyze the dispersion parameters of the first 2 optical modes at the source plane of my FDTD simulation setup”
“Perform a parameter sweep to vary the unit cell period between 0.3 to 0.5 micrometers”
Build From Scratch
“Create a simple FDTD simulation setup to simulate a silicon strip waveguide with dimensions (0.5, 0.22, 10) and refractive index of 3.47”
“I am interested in PIC devices. Build a setup to obtain the modal power at the outputs of a y-junction waveguide. Add s-bends to the output waveguides”
“I want to build a simulation setup to investigate structural color generation”
Analysis
“Plot the field intensity profile obtained from the FieldMonitor at the central frequency”
“Considering my parameter sweep simulation, plot the |E|^2 field profile for all the modes in the largest waveguide”
“Plot the reflectance spectrum of all unit cell period values in the parameter sweep simulation in a single chart”
🖥️ 3D Viewer#
Opening and Using the Viewer#
The Tidy3D viewer automatically detects simulation objects in your Python files and notebooks. No code execution required – the viewer parses your td.Simulation(...) definitions directly from the source code.
Access Methods:
Status Bar: Click “Tidy3D: N simulations” entry
Command Palette:
Tidy3D: Open Tidy3DContext Menu: Right-click in Python editor (
.pyfiles)
Real-Time Updates:
Geometry changes reflect instantly in the viewer
Material property modifications update colors
Source and monitor positioning updates automatically
No need to re-execute cells or restart kernels
Multi-Simulation Support:
Navigate between multiple simulations in the same file
Quick picker for simulation selection
Independent viewer instances for comparison
AI-Controlled Viewer Operations#
Copilot can control the viewer programmatically through integrated MCP tools:
Viewer Navigation:
tidy3d_start_viewer(file, symbol)– Open live 3D viewerAutomatic camera positioning and scene setup
Structure visibility toggling and material highlighting
Screenshot & Documentation:
tidy3d_capture(viewer_id)– Capture viewer imagesAutomatic annotation of sources (green) and monitors (yellow)
Integration with reports and documentation workflows
Structure Analysis:
tidy3d_show_structures(viewer_id, visibility)– Toggle structure visibilityLayer-by-layer analysis of complex geometries
Material property visualization and validation
Simulation Validation:
tidy3d_check_simulation(viewer_id)– Surface viewer reportsPhysics validation and warning detection
Automatic re-checking after code modifications
📦 Installation & Setup#
Prerequisites & System Requirements#
Visual Studio Code: Version 1.99.3 or newer
Python Extension: Python extension enabled for notebooks and Python files
Internet Access: Required for initial downloads and cloud connectivity
Operating System: Windows, macOS, or Linux
Extension Installation#
From VS Code Extensions View
Open Visual Studio Code and go to Extensions view (
View → Extensions)Search for “Tidy3D” by Flexcompute
Click Install on the official extension
Direct Installation
Click “Install” and follow prompts to open in VS Code
Post-Installation
Ensure Python extension is enabled
Restart VS Code if prompted
Tidy3D Account Setup#
Create Free Account
Complete registration
Verify your email address
Get API Key
Login to SimCloud
Navigate to Account → API Key tab
Copy your personal API key
Configure Extension
In VS Code:
Cmd/Ctrl+Shift+P → Tidy3D: Run Tidy3D Workspace SetupPaste your API key when prompted
Extension will verify connectivity and setup MCP server
Modify the API key anytime at
Files → Preferences → Settings → Extensions → Tidy3D (Cmd/Ctrl+,).
Enable Copilot Chat Instructions#
After running Cmd/Ctrl+Shift+P → Tidy3D: Run Tidy3D Workspace Setup, the extension creates instruction files under .github/instructions/.
Enable Instructions in Copilot:
Open VS Code Settings (
Cmd/Ctrl+,)Search for “copilot chat instructions”
Enable:
github.copilot.chat.codeGeneration.useInstructionFilesVerify by sending a chat message and expanding “References” to see loaded instruction files
Python Environment Setup (Optional)#
While you can view simulations without a local Python setup, notebook execution requires a configured environment. Visit the Tidy3D Python installation for detailed instructions.
Environment Managers Supported:
uv(recommended for new projects)conda/micromambapoetry,rye,hatchvenv(Python standard library)
Example with uv:
# Install uv from https://docs.astral.sh/uv/getting-started/installation/
uv init my-tidy3d-project
cd my-tidy3d-project
uv add tidy3d jupyter numpy matplotlib
uv sync
Environment Selection in VS Code:
Open Command Palette (
Cmd/Ctrl+Shift+P)Type “Python: Select Interpreter”
Choose your Tidy3D environment
Verify with
import tidy3din a notebook cell
📚 Technical Reference#
Extension Commands & Shortcuts#
Primary Commands:
Tidy3D: Open Tidy3D(tidy3d.openViewer)Access: Command Palette, Python editor context menu, status bar
Function: Opens 3D viewer for detected simulations
Shortcut: Click status bar “Tidy3D: N simulations”
Tidy3D: Run Tidy3D Workspace Setup(tidy3d.installWorkspaceSetup)Access: Command Palette
Function: Configures API key, MCP server, Copilot instructions
Auto-trigger: Prompts on first
.py/.ipynbfile with Tidy3D code
Configuration Settings#
Core Settings:
tidy3d.apiKey(default: empty) – API key for authentication (workspace-scoped)tidy3d.pythonVersion(default:3.12) – Python version for built-in runtime
Viewer Configuration:
tidy3d.viewer.remoteUrl(default:https://tidy3d.simulation.cloud/simulation-viewer)tidy3d.viewer.tidyVersion(default: empty) – Override Tidy3D package versiontidy3d.screenshotsDir(default:reports/.tidy3d-screenshots) – Screenshot folder
Advanced Settings:
tidy3d.viewerBridge.port(default:0) – Local bridge port (0 = auto-select)tidy3d.viewerBridge.bindAddress(default:127.0.0.1) – Bind interfacetidy3d.mcp.remoteUrl(advanced) – Base URL for MCP servicetidy3d.mcp.runCommand(advanced) – Custom MCP server launch commandtidy3d.mcp.enableViewer(default:true) – Enable viewer tooling in MCP
MCP Tools & Capabilities#
Documentation Integration:
tidy3d_search_flexcompute_docs(queries, max_results)– Batch documentation searchtidy3d_fetch_flexcompute_doc(url)– Fetch specific documentation pagesReal-time API validation and version checking
Viewer Control:
tidy3d_start_viewer(file, symbol)– Launch live 3D viewertidy3d_capture(viewer_id)– Capture screenshots with annotationstidy3d_show_structures(viewer_id, visibility)– Toggle structure visibilitytidy3d_check_simulation(viewer_id)– Physics validation and reporting
🔧 Troubleshooting & Support#
Common Issues & Solutions#
The assistant doesn’t understand the Tidy3D contexts: For best performance, explicitly reference the integrated rules: “Follow the FlexAgent rules in
copilot-instructions.mdfor all responses. These rules take priority over other instructions.” (See AI Collaboration Best Practices)No simulations detected – ensure a variable receives
td.Simulation(...)(or another supported solver type) in the active file.Workspace setup missing – confirm the Python extension is active and the file uses the python language mode.
Slow first run – wait for initial downloads; you’ll see “Tidy3D Kernel: ready” in the status bar when ready.
Viewer cannot connect – verify your API key and outbound access to
tidy3d.simulation.cloud.
Getting Help#
Before Requesting Support:
Try the assistant: “Help me troubleshoot this Tidy3D simulation issue”
📄 License#
Proprietary – Flexcompute Inc.
The Tidy3D for VS Code extension is proprietary software developed and maintained by Flexcompute Inc. All rights reserved.